fbpx

About AutoDCP

AutoDCP is a cloud-based tool for automatically creating DCPs from your content. It allows you to simply and automatically create correctly configured DCPs from anywhere and effortlessly deliver them to anywhere. AutoDCP is convenient, powerful and very easy to use. No longer are you at the mercy of expensive couriers, post houses or overnight delivery companies. And you can rest secure, knowing that AutoDCP uses a MPAA-approved, cloud-based server, ensuring that your content is safe from copying and harm.

Read this FIRST.

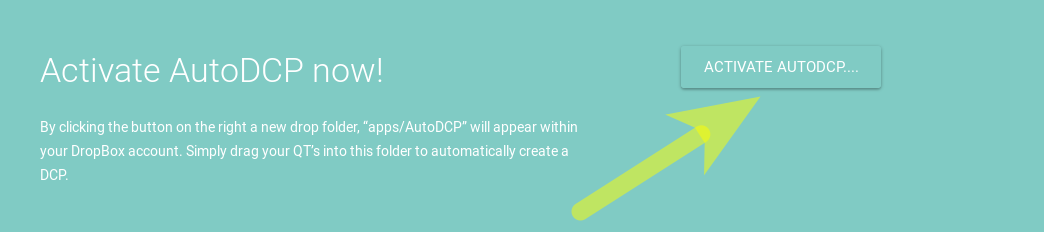
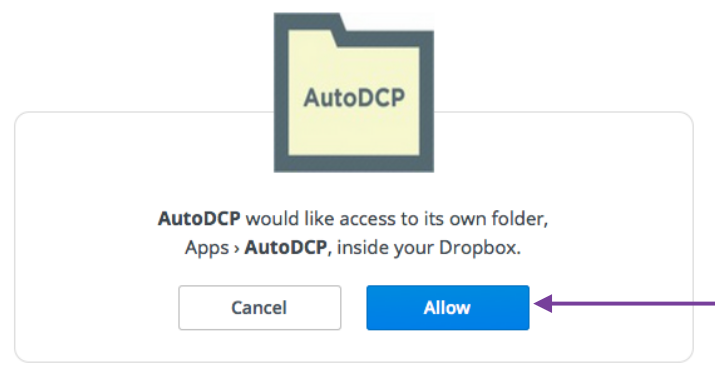
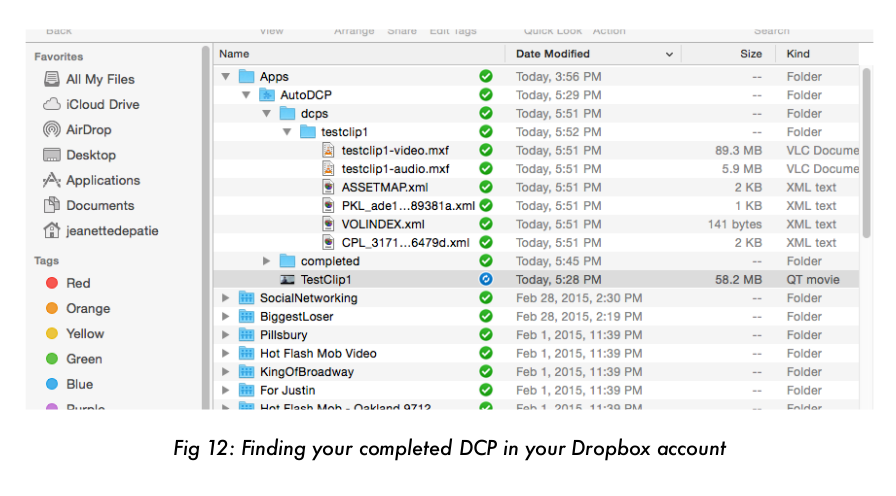
AutoDCP works with your Dropbox account. Thus, all you’ll need to do is drag your source files into the special Dropbox AutoDCP folder and we’ll do all the rest. The product is very simple.  However, there are some things you should know before you get started with this product.

  • You will need to have a Dropbox account with sufficient space to hold both your raw source files and your finished DCPs.
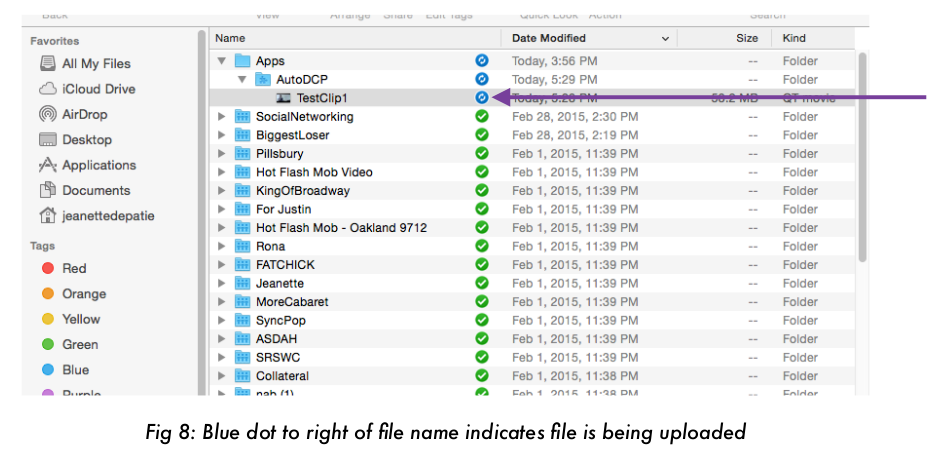
  • AutoDCP works best if you are using a local copy of Dropbox on your system as opposed to the web-based version of Dropbox. It will work in either case. However, it’s faster and more convenient to use Dropbox on your computer than from a web-browser
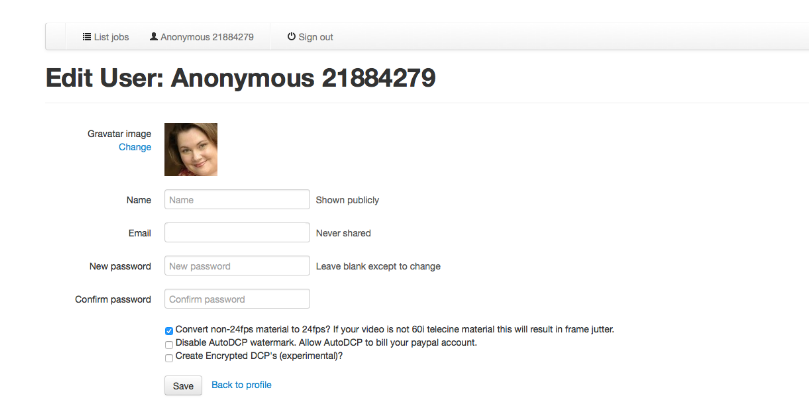
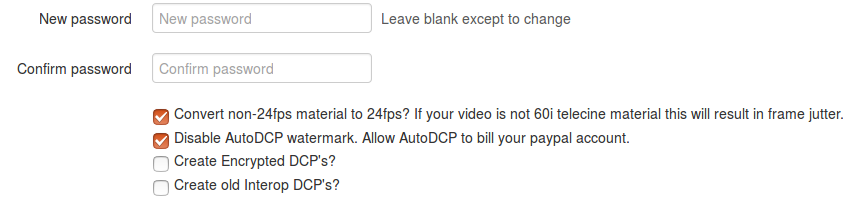
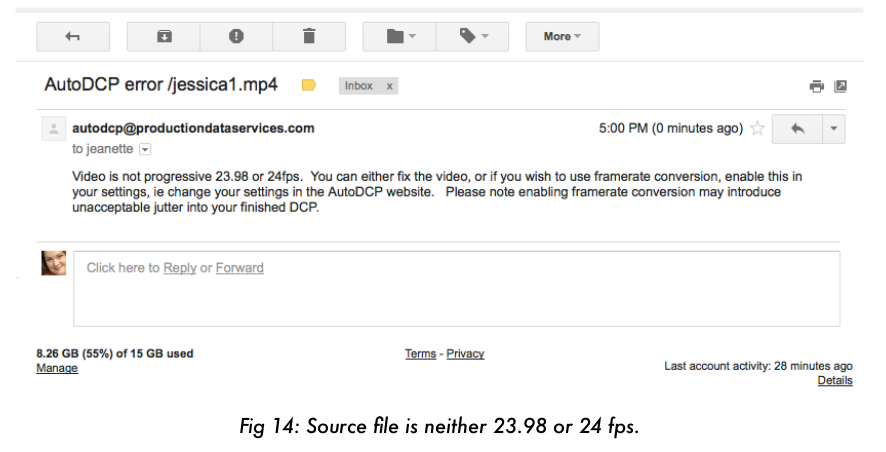
  • AutoDCP will create DCPs from your files EXACTLY AS YOU SEND THEM. Outside of the ability to convert properly created telecine files to  24p, there are no manipulation tools within AutoDCP to change your content.
  • AutoDCP uses the power of the cloud to do the DCP conversion. This means that the tool can convert many files quickly and simultaneously.   However, the upload speed from your computer or facility can significantly impact the time it takes to deliver the files to the cloud. Use the fastest connection available to you.
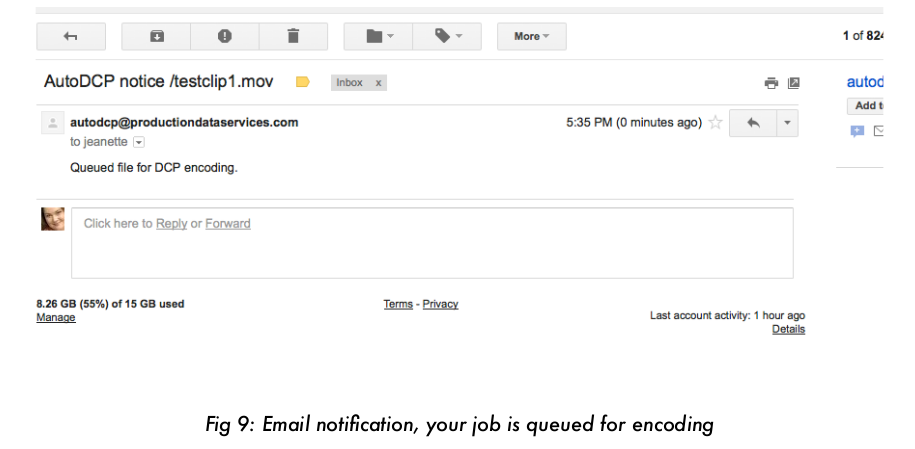
  • AutoDCP has a free watermarked version of the tool available for encoding up to 2 minutes of content. This is an excellent way to test the tool.  We strongly suggest that you upload a test clip well before your deadline to ensure that you have properly prepared your files and that the resultant DCPs are proper for the film festival.
  • AutoDCP can be used to make free DCP’s.  Check out the tutorial on how to make DCP’s for free located here.

Installation Guide

  1. Make sure you have a Dropbox account and make sure the Dropbox app is installed on your system. If you do not have a Dropbox account, you can sign up for one free of charge at www.dropbox.com.
  2. Go to www.autodcp.com
  3. Click on the button labeled “Activate AutoDCP”.
  4. You will see a dialog box like the one pictured below. Click the Allow button to allow AutoDCP access to your Dropbox account.DropboxAllow
  5. You will see a “Thank You Screen”. AutoDCP is now successfully installed on your system.
  6. Go and check your email. You may have an email from Dropbox telling you that a new app has been installed (depending on your notification settings within Dropbox.) You should also have an email from AutoDCP@productiondataservices.com. At the bottom of this email is a login and password. Save this email for future reference, these credentials are required to login to autodcp to check the status of any jobs you submit.

Creating DCP’s

  1. When you installed the application, AutoDCP created a folder within your Dropbox account. The folder labeled AutoDCP can be found in the Apps folder in Dropbox (Fig. 7).fig7
  2. To create a DCP, simply drag your video file into the folder labeled AutoDCP within Dropbox.
  3. Underneath the AutoDCP folder, you will see your video file. While the file is uploading, you will see a little blue circle to the right of the file name in Dropbox. This indicates the file is being “updated”. You will not get any further notification until your file is fully loaded into your Dropbox folder (Fig. 8). fig8
  4. Once your file is uploaded, you will get an email from autodcp@productiondataservices.com notifying you that the job has been queued (Fig. 9). fig9
  5. At this point, you can login to your AutoDCP account to monitor your job if you wish. To login to your AutoDCP account, go to www.autodcp.com. Click the login link on the very top right of the page. Enter your name and password to log in. (If you have not updated your name and password, you can do that following the directions in the Edit Settings part of this document.)
  6. Once you have logged into your account, click the list jobs button to see any jobs you have pending (Fig. 10).fig10
  7. In the Current Status column, you will see: checking source, source okay, encoding, encoded waiting for payment or upload completed.
  8. As soon as the job is encoded, you will receive an email with a Paypal invoice for the final billing of the project. The job is finished and waiting for you, but you cannot access the finished file until payment is received (Fig. 11).fig11
  9. Open the invoice email and click on the View and Pay Invoice button. You may proceed using your Paypal account or using a credit card via Paypal.
  10. Once you have paid for your DCP, it will appear in your Dropbox account. You will note that there is a new folder within AutoDCP labeled “dcps”. within that folder is another folder named after your original source file. Within that are all the files which make up your DCP.  Your original source will now be returned to the folder. (See figure 12 below.)  fig12
  11. To deliver the DCP to a projectionist or festival, simply copy the entire contents of the folder “testclip1” to an externally mounted USB stick or HDD.  A couple points to understand about the process of copying to an external device
    • The external media needs to be formatted as NTFS (windows) or EXT2 (linux).  It can not be formatted mac.  HFS, or similar mac formats are not supported by projectionists.
    • You can store as many DCP’s on an external stick as will fit, ie you can put them all in their own subdirectories.
    • A DCP is collection of files in a subdirectory.  The name of the subdirectory can be whatever you want, ie you can change its name at will.  However, do not change the names of any files in the subdirectory, e.g., the xml’s, the mxf’s etc.

Edit Your Settings

AutoDCP runs out-of-the-box without making any changes to its defaults.  But if you want to make free DCP’s or enable SMPTE support, you’ll do it within this your settings.

  1. First go to www.autodcp.com and click the login button in the upper right corner of the page. Now cut and paste your email and login from the bottom of the welcome email you received from autodcp@productiondataservices.com
  2. You will now be at the opening page. Your page will be labeled Anonymous followed by a long string of numbers, now is a really good time to change your name and password. First click the icon that looks like a man’s head. This will bring you to your personal page (see
    below)AutoDCP-editsettings
  3. Click on the little blue “Edit” link to get to your edit settings page.AutoDCPEditsettings2
  4. Begin by filling in the Name and New Password boxes with something easier for you to remember. Confirm your password by typing your password in again in the Confirm Password box. Then click the Save button.AutoDCPeditsettings4
  5. You will notice that there are four additional checkboxes on this page. The first of these states “Convert non-24fps material to 24fps?” Earlier, we stated that AutoDCP creates DCPs from your content exactly as you upload it. The only possible exception is this checkbox. If you wish, you can set AutoDCP to convert non 24 fps content to 24fps. However PLEASE NOTE: AutoDCP will properly convert 60i telecine material directly to 24fps. But IF YOUR SOURCE CONTENT IS NOT 60i TELECINE MATERIAL, selecting this option will lead to 24 fps DCPs which may not play smoothly (or may exhibit frame jitter). If this box is checked, AutoDCP will create 24fps video from every source you submit.
  6. The second checkbox states “Disable AutoDCP watermark. Allow AutoDCP to bill your Paypal account.” Any content that is over 2 minutes in length will require payment via Paypal.  However, you can use AutoDCP to create watermarked videos that are under 2 minutes in length free of charge. This is especially useful for doing test clips. PLEASE NOTE: IF THIS BOX IS NOT CHECKED, ALL VIDEOS UNDER 2 MINUTES IN LENGTH WILL HAVE A WATERMARK STATING THEY WERE ENCODED USING AUTODCP. If you do not wish to have this watermark on your shorter videos, please check the box.
  7. The third box states “Create Encrypted DCPs”.  This is an advanced feature, if you use this feature you must also then generate KDM’s to allow playback on a given screen.  Contact us for further information.  It’s not too hard, but it’s not something a beginner should explore.
  8. The fourth box, is labeled “Create old interop DCP’s.”   By default (unchecked) AutoDCP generates the newer form of DCP known as a SMPTE DCP.  To generate the older form, known as “interop” check this box.  This article talks about when to use interop versus SMPTE compliant DCP’s, it’s not really about technology it’s about the current state of the industry.
  9. You may edit your settings any time you wish.

Troubleshooting.

Most of the time, creating DCPs with AutoDCP is simple and trouble-free. However there are sometimes challenges due to source materials, billing, file sizes and other issues. Don’t panic!  In most cases, there is a very simple solution. Here are some of the most common problems you may face.
1.  Insufficient Space: Your Dropbox account must contain enough open space to hold both the source file and the finished DCP. In some cases these files are very large. Dropbox offers accounts for free, but they do not offer unlimited disc space. You may find that you need to purchase additional storage from Dropbox in order to continue with your project. If you load a project into AutoDCP that is too large to fit into your Dropbox account, you will receive an email from autodcp@productiondataservices,com telling you what to do. It will look like the figure below (see figure 13.)

fig13

As the email states, at this point you either need to add space to your Dropbox account or remove files from your Dropbox account that you don’t need. Once sufficient space is available in your Dropbox account, AutoDCP can easily finish creating your DCP.  Just follow item (3) below.

2.  Improper Frame Rate DCPs must be created at either 23.98 or 24 frames per second. If the content you have provided is not at 23.98 or 24 fps, it must be converted in order to create a DCP. If you have the “Convert non 24fps content to 24fps” button checked in your AutoDCP settings (see fig. 6 in Edit Settings) it will do this conversion automatically.  (Although, as previously noted, if your original content is not 60i telecine files, the conversion may not be completely smooth and may exhibit frame jutter.) If you do not have this box checked in your AutoDCP settings, and you provide content that is not 24 fps, you will get an email that lookslike the figure below (see figure 14.)

fig14

At this point, you can either check the “Convert non 24fps to 24fps” box in edit settings, or you can cancel the job (by deleting the folder from your Dropbox account), convert the files to 23.98 or 24 fps yourself and then resubmit the job at the new frame rate.

3.  Resubmitting Jobs from the Problem Folder When AutoDCP has a problem with one of your projects, it generally puts your source file into a folder labeled Problems within your AutoDCP folder on Dropbox. Once you resolve whatever issue is outstanding (improper frame rate, insufficient space, etc.) you don’t need to start the entire process again. Simply drag the source file out of the “Problems Folder” and drop it on the AutoDCP root folder in Dropbox to reinitiate the job.

Leave me comments,  this is an online document that is likely to be updated numerous times, love to hear what you want me to focus on.

keyboard_arrow_up